From My Kitchen Today:
As promised, here is the step-by-step of the most fabulous muffins ever to hit your table. We eat lots of muffins 'round these parts (as in, I make a batch at least every week). What makes these muffins perfect is that we also eat loads of bananas. And at any given time, there are a few bananas about to "expire." So what better to do with those black-spotted leftovers than to make muffins?
Here we go:
Start by gathering all of your ingredients together. As someone who bakes or cooks everyday, I quickly learned that taking a few minutes before you start a recipe to raid your pantry/fridge for all the ingredients will save you lots of time by the end. No starting/stopping of mixing or prepping to run and grab something you need--it's all right there.
Next, grab an adorable sous-chef with a curly blonde ponytail. Oh wait--this is not required. You can skip this step. But I'm sure glad I included it :)
I photographed the bananas separately so that you can see how ripe these were. (Don't mind that there are 6--I doubled the recipe for us). These are actually about the earliest I would bake with a banana. In fact, they usually look much, much worse--large black spots from tip to tip. This is good news for baking because as a banana ripens, it's sugars concentrate and the fiber changes--two things that make past-ripe bananas a perfect ingredient to bake with! If you try to bake with under-ripe bananas, the flavor and the texture of the batter will be off.
Toss the peeled bananas into your mixer and beat until they are completely mashed. There can be a few chunks in there, but you want the bananas to be almost smooth because at that point, they are adding to the liquid content of the recipe.
Add your brown sugar, egg, and oil to the mashed bananas and beat until well mixed.
In a separate bowl, combine the flours, baking powder, baking soda, and salt. Mix them up until they are combined.
With the mixer on low, add the flour mixture to the wet ingredients. Don't over mix--over mixing will create a tough batter (by developing the gluten in the flour. Tough batter=tough muffin). You want there to still be some streaks of flour in there.
Add the yogurt and vanilla, and mix until almost combined. You want to have streaks of yogurt left (see above). Then you can take the batter away from the mixer and finish mixing it by hand.
Once the batter is fully mixed, use an ice cream scoop to fill muffin cups 3/4 full. Sprinkle a little brown sugar on top of each muffin for a nice crunchy topping. By the way, these muffin cups are the best! They are made of silicone, and as such, nothing sticks. So I can put them directly on a baking sheet (no muffin tin needed), and once one batch of muffins are done baking, I can pop them out and fill the cups right back up--no cleaning required. Plus, they nest so it takes up much less space in my tiny kitchen than traditional muffin tins, and there are no paper liners to hit the landfill!
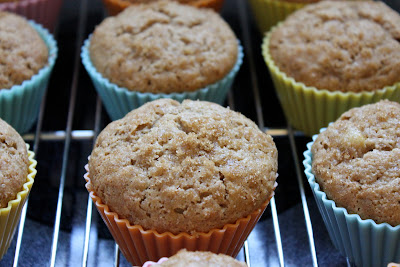
Bake for 25 minutes until a cake tester (or toothpick--I just like the cake tester because it's reusable :) comes out clean. They will look like this, with little cracks on top.
Lastly, bask in the scent of banana-baked-goodness while you fill your coffee mug and settle down for a treat! Hope you enjoy these as much as we do.
Chelsea
Click this link for the recipe in a printable format.


Those sound good and the photos are great, especially of the baked muffins. Awesome photography, and a super cute helper.
ReplyDeleteignore my share request. I got it.
ReplyDeleteOh my gosh! I LOVE this! These pictures are great! I love the way you illustrate it with pictures! They look delicious!! Too bad Brian is allergic to bananas otherwise I'd be on this like hotcakes!
ReplyDelete